Showing posts with label whipped cream. Show all posts

Thursday, July 3, 2014

Sky High Strawberry Shortcake

Happy 4th of July, my American readers, which, I'm going to just assume is the majority of you (if there are international readers out there, I would love to hear from you!). This year is the first year I'll be celebrating the 4th of July without my family, which is a weird prospect for me. It's not that the 4th is a huge deal in my family, it's just that...we've always been together, doing almost the exact same thing, for basically my entire life (save the year we were in Canada for the 4th, but we still watched Canada Day fireworks together over Niagara Falls). 


Here's what always happened: when we were younger, we would go down to the park by the river, either together or with friends, and play silly carnival games, pet baby animals, and watch the water ski team do tricks. Then we either attended a party at a house on the river's edge, or, in more recent years, staked out a spot in the park and watched the fireworks over the river. I love fireworks – certain things will never stop being awe-inspiring to me, and the 4th has the added punch of nostalgia. 


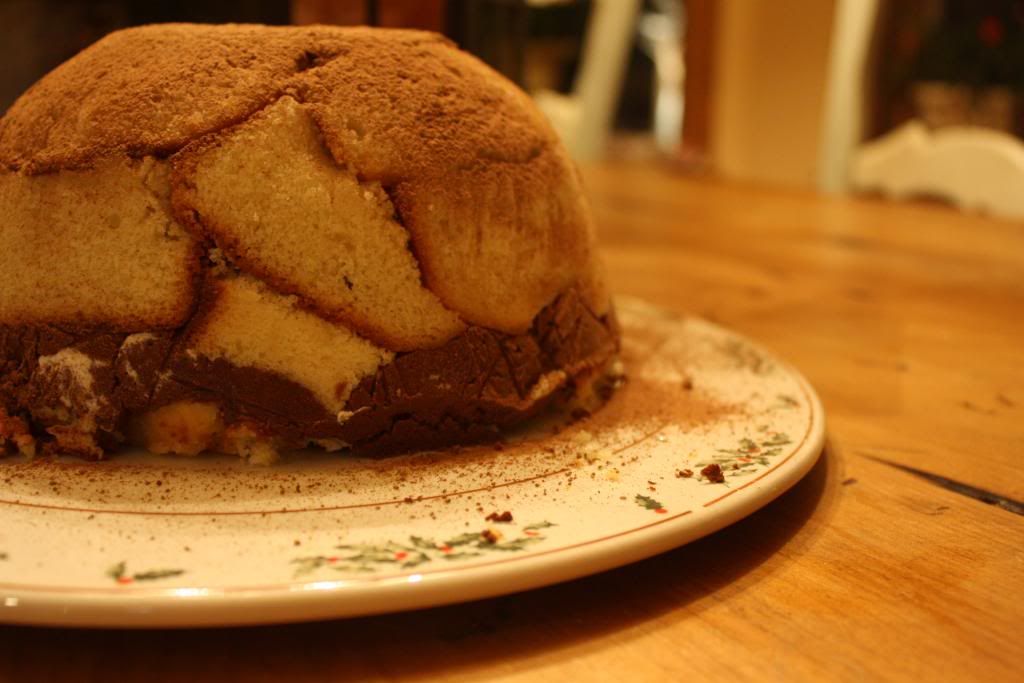
Maybe I'll start developing new traditions? Or maybe things will just be eclectic and vary from year to year. Maybe I'll make a massive strawberry shortcake like this one. It's not as big as it looks, since each layer is only 6 inches, but it's still fairly impressive. And way better than those spongy little cups and "non dairy whipped topping" (shiver). 


Sky High Strawberry Shortcake
(I can't get the italics off, guhhhh)
Adapted from Sky-High Irresistible Triple-Layer Cakes
Makes one 6-inch triple layer cake; serves 8 to 10
 
Cake
5 tablespoons unsalted butter, at room temperature
3/4 cup sugar
1 teaspoon vanilla extract
2 eggs
1 1/2 cups cake flour
2 1/2 teaspoons baking powder 
1/4 teaspoon salt
2/3 cup buttermilk
 
Lightly Sweetened Whipped Cream
1 1/2 cups heavy cream
2 tablespoons sugar 
 
Fresh Strawberry Filling
2 pints strawberries, small if possible, about 1/2 pint reserved for garnish
1 teaspoon of rosewater or 1 tablespoon anisette liqueur 
1 teaspoons vanilla extract
1/4 cup sugar
 
 
For the Cake Pre-heat the oven to 350 degrees F. Grease the bottoms and sides of three 6-inch round cake pans.  Line the bottom with a round of parchment of waxed paper and then grease with butter.
In a stand mixer fitted with paddle attachment or electric hand mixer, cream butter, sugar and vanilla until light and fluffy. Add eggs, one at a time, scraping down the sides of the bowl after each addition.
Sift flour, baking powder and salt together. Add dry ingredients to the batter, alternating with buttermilk in 2 to 3 additions. When mixing, do not let the mixer exceed medium speed (unless using a low-power hand-held mixer). This will ensure that gluten does not form, and you have a soft airy cake. Divide patter evenly among three prepared cake pans.
Bake cakes for 20 to 25 minutes, or until a toothpick inserted in center comes out clean. Let cakes cool in pans for 10 minutes; invert cakes onto wire racks, carefully peel off parchment and allow cakes to cool completely.
For the Fresh Strawberry Filling & Whipped Cream
Clean and hull strawberries, and slice into pieces about the thickness of a nickel. My berries were really small and compact in the pints, so I stopped slicing when I had about 1 1/2 to 2 cups of berries. Place sliced berries in a bowl and add sugar, rosewater and vanilla. Toss to coat, cover and let berries macerate at room temperature for about an hour.
In a large chilled bowl, with chilled beaters, whip the cream and sugar until stiff. There will be about three cups.
To Assemble
Place one layer on cake stand or serving plate, flat side up. Top with 3/4 cup of strawberry filling, spooning over the entire cake layer, and trying to keep juices from running on the plate. Top with one cup of whipped cream, spreading evenly over berries. Repeat with second layer of cake, 3/4 cup of berries, and 1 cup of whipped cream. Top with remaining layer of cake. Cover with last of the whipped cream and garnish with fresh, whole berries. For best flavor, cover the cake with dome or loose plastic wrap and refrigerate for about two hours before slicing and serving.
 
Note: I reduced the strawberry filling slightly since I didn’t think the cake needed additional berries spooned over the cake for serving. If you’d like to serve extra sliced berries on the side, increase berries to 2 quarts, rosewater to 2 teaspoons, vanilla to 2 teaspoons and sugar to 1/2 cup.

Friday, September 27, 2013

Daring Bakers! Coconut Tres Leches Cake

Inma of la Galletika was our Sept. 2013 Daring Bakers’ hostess and WOW did she bring us something decadent and delicious! Pastel de Tres Leches or Three Milk Cake, creamy yet airy, super moist but not soggy... just plain delish!

I was simultaneously excited and apprehensive about the Daring Bakers challenge this month. Not because of the recipe, but just because of all the oven fails I've been having lately. I decided to minimize risk and take my baking elsewhere. A large number of my female friends live in an honor house dedicated to sustainable food, and informed me I was welcome to use their oven anytime. So I packed up all my supplies and trucked it down to the house. It was nice to have a large enough space for me to bake and socialize at the same time. 


I slid the cake into the oven nervously, praying that it would not burn or collapse. Thirty five minutes later I pulled it out and hurrah! It had baked up into a fluffy, golden sponge. 
"That smells really good!" someone called from the dining room, and I did a small victory dance (mostly an internal victory dance). Finally, a success. 


Obviously I wasn't done there, but the tricky part was over. You can't have a tres leches cake without the milks! I've made the traditional recipe before, so I wanted to try something new. I was delighted to find that The Pastry Affair had a coconut tres leches cake on her site. The sponge is soaked in a mixture of sweetened condensed milk, coconut milk, and coconut rum (side note, purchasing this was my first time actually buying something from a liquor store. I was a little nervous that there would be some rule I had overlooked preventing me from purchasing alcohol and I would be unceremoniously booted from the store. Thankfully that did not happen). Finish it off with a thick layer of coconut rum spiked whipped cream and toasted coconut and you've got yourself...a pretty irresistible cake.


Coconut Tres Leches Cake 
from The Pastry Affair


Cake
5 large eggs, separated
1 cup granulated sugar, divided
1 teaspoon vanilla extract
1/3 cup whole milk
1 cup all-purpose flour
1 1/2 teaspoons baking powder
Pinch of salt

Preheat oven to 350 degrees F (175 degrees C). Grease a 9 x 13-inch cake pan.
In a large bowl, beat the egg yolks with 3/4 cup sugar until the yolks are a pale yellow. Stir in the milk and vanilla. Fold in the flour, baking powder, and salt until just combined.
In a separate bowl, beat the egg whites until soft peaks form. Add the remaining 1/4 cup sugar and continue beating until stiff peaks form.
Gently fold the egg whites into the cake batter, mixing until just combined (over-beating will result in a denser, flatter cake—not what we want!). Pour batter into prepared pan and bake for 30-35 minutes, or until cake is lightly browned and a toothpick inserted into the center comes out clean. Cool in pan until cake reaches room temperature. Pierce top of cake with a fork a couple dozen times to allow glaze to soak into the cake.

Glaze
1 can (14 ounces) coconut milk
1 can (14 ounces) sweetened condensed milk
1/2 cup coconut rum

In a medium bowl, whisk together coconut milk, sweetened condensed milk, and coconut rum. Pour evenly over cooled, hole-ridden cake, making sure to get the edges and corners as well as the center. Now here's the hard part: refrigerate the cake overnight so the cake can fully absorb the glaze.

Topping
1 pint (2 cups) heavy whipping cream
1/2 cup granulated sugar
1 tablespoon coconut rum
Flaked coconut, toasted (garnish)

In a large bowl, beat the heavy whipping cream, sugar, and coconut rum together until topping is thick and spreadable.
Spread topping evenly over coconut cake, sprinkle with toasted coconut flakes, and refrigerate until ready to serve.

Monday, May 27, 2013

Daring Bakers! - SWEDISH PRINSESSTÅRTA

Korena of Korena in the Kitchen was our May Daring Bakers’ host and she delighted us with this beautiful Swedish Prinsesstårta!


Hey guys, no time no see. At least, it feels that way. I mean, last time I talked to you I was 3500 miles away. It somehow seems like just yesterday but also a lifetime ago. Since then I haven't had much time to relax. Running around like a chicken with my head cut off trying to see people before they leave on their summer journeys.


For me, this summer will be similar to my last one. Living at home, interning here, and making a lot of cakes, for business and pleasure. I absolutely cannot wait, and I will be sure to keep you guys updated on that front. In some ways...I feel slightly guilty that I'm not doing something really crazy and bold and out there, like some of my other friends, but I think I need this summer to unwind after my adventurous semester. Do you think that's reasonable? 

If nothing else, I can still be daring in the kitchen! I'm pretty disappointed in myself because I just didn't have the resources to do April's challenge (which I will do in the future, now that I'm back and have my full arsenal of kitchen magic, haha). So even though I knew I'd be rushing to get it done, I HAD to do May's challenge - Princess Cake! It's been on my baking list for a while! Apparently the modern recipe is based on a series of recipes developed especially for the Swedish princesses in the 1930's by a home economics teacher named Jenny Åkerström, who taught the princesses. I like recipes with a story. And this cake is pretty incredible, I can see how it was a royal favorite. Layers of sponge cake meld with raspberry jam, custard, and a mound fresh whipped cream. The whole thing is then covered in green marzipan (dunno why, that's just how it is). Swoon, nom. I made mine all silly looking and covered it with plastic animals and big sprinkles so it sort of looks like a weird dinosaur egg. Cause that's how I roll. 


Prinsesstårta

Servings: 8 – 10. Makes one 9” round cake.

Vanilla Custard

Ingredients
1 cup (240ml) heavy cream, divided
4 egg yolks from large eggs
2 tablespoons (30 ml) (15 gm) (½ oz) cornstarch
2 tablespoons (30 ml) (30 gm) (1 oz) granulated white sugar
1 vanilla bean, split and scraped (or 2 teaspoons (10 ml) vanilla extract)

Directions:
1. In a medium bowl, whisk together the cornstarch, sugar, and egg yolks. Gradually whisk in ½ cup (120 ml) of heavy cream until smooth. Meanwhile, in a medium saucepan over medium heat, combine the remaining ½ cup (120 ml) of heavy cream and the scraped vanilla bean and bring just to the boiling point. Remove the vanilla bean pod, leaving behind the seeds. Slowly whisk the hot cream into the bowl with the egg mixture to temper the eggs.
2. Pour the mixture back into the saucepan and cook over medium-low heat, whisking constantly, until it becomes thick like pudding and just comes to a boil. The mixture must hit a boil for the cornstarch to properly thicken the custard, and also to cook out any starchy taste. If it starts to look curdled or lumpy, remove it from the heat and whisk vigorously until smooth, then return to the heat. As soon as it comes to a boil, remove it from the heat. If using vanilla extract, add it now.
(If desired, pass the custard through a fine mesh sieve before continuing.)

3. Pour the custard into a clean bowl and press a piece of plastic wrap directly onto the surface to prevent a skin from forming. Refrigerate until completely cold. Can be prepared a day ahead and kept in the refrigerator.

Sponge Cake

Ingredients
Fine dry breadcrumbs for the pan (such as crushed panko)
4 large eggs, at room temperature
1 cup (240 ml) (225 gm) (8 oz) granulated white sugar
½ cup (120 ml) (70 gm) (2½ oz) all-purpose (plain) flour
½ cup (120 ml) (65 gm) (2¼ oz) potato starch (or cornstarch)
1 teaspoon (5 ml) (5 gm) baking powder
1/8 teaspoon salt

Directions:
1. Preheat the oven to moderate 350°F/180°C/gas mark 4 with a rack in the lower third of the oven. Thoroughly butter a 9” (23 cm) round springform pan, line the bottom with a circle of parchment paper, then butter the paper. Dust the buttered pan with enough breadcrumbs to coat the bottom and sides, just like flouring a cake pan. Set aside.
2. Place the eggs and granulated white sugar in a mixing bowl and beat on medium-high speed with an electric mixer or stand mixer with whisk attachment until the eggs are tripled in volume and very light colored and fluffy, about 5 minutes. The mixture should fall from the beaters in thick ribbons. Don’t overbeat the eggs – once they form thick ribbons and stop growing in volume, stop beating. 
3. Sift the all-purpose (plain) flour, potato starch, baking powder, and salt into a bowl, then sift the flour mixture over the whipped eggs. With a balloon whisk, fold the flour into the eggs until blended, keeping as much air in the batter as possible. Use large, gentle yet confident strokes, bringing batter from the bottom of the bowl to the top. Once mixed, the batter should be quite thick and smooth.
4. Pour the batter into the prepared pan, spread it out evenly, and bake in the lower third of the preheated moderate 350°F/180°C/gas mark 4 oven for about 40 minutes or until golden brown on top, springy to the touch, and a toothpick inserted in the center comes out with a few moist crumbs sticking to it.
Let the cake cool in the pan for a few minutes then run a knife around the edge and remove the sides of the springform pan. Don’t worry if it sinks a bit in the middle.
invert the cake onto a cooling rack and peel off the parchment paper. If the cake is lopsided, press gently to make it level, then allow it to cool completely before continuing. The cake can be made a day ahead and stored, well-wrapped in plastic, at a cool room temperature.

Marzipan Covering

Ingredients
10 oz (285 gm) marzipan
Green and yellow food coloring
Icing sugar, for rolling

Directions:
 Knead the remaining marzipan on a surface dusted with icing sugar until it becomes softer and smooth (the warmth from your hands will help this).
2. Add a small amount of green food coloring (I used 3 or 4 drops of liquid food coloring) and knead it into the marzipan to get the desired shade of green. You might need to add a little more green or yellow food coloring to get the right color – anything from pastel green to bright spring green (just not neon green!) Wrap tightly in plastic and refrigerate until you are ready to cover the cake (or store as directed on the marzipan package).


Prinsesstårta Assembly

Ingredients
2 cups (480 ml) heavy cream, chilled
granulated white sugar, to taste (scant 1 tablespoon is plenty)
Sponge Cake, cooled
1/3 cup (80 ml) seedless raspberry jam (or regular jam pressed through a sieve to remove seeds)
Vanilla Custard, chilled
Marzipan Covering
Icing sugar, for rolling and dusting
Optional: melted chocolate, royal icing, or piping gel

Directions:
1. In a large bowl, whip the heavy cream until soft peaks form. Add sugar to taste (keep in mind that the rest of the cake components are sweet, so the whipped cream should be very lightly sweetened at most) and continue whipping the cream until stiff. You want it to be sturdy enough to provide structure to the cake, but not over-whipped enough to make butter. Set the whipped cream aside.
2. With a long serrated knife, slice the sponge cake into three even layers. This cake is very delicate, so do this as carefully as possible. Use a gentle sawing motion to move the knife through the cake instead of trying to pull it through the cake. Use a spatula to help you lift off each layer after you cut it. Set aside the middle layer – this will become the top layer of the assembled cake as it is the most flexible and therefore easiest to bend into a dome over the whipped cream.
3. Place one of remaining layers on a cake board or serving platter and spread it evenly with the raspberry jam. Spread or pipe half the chilled custard over the jam in an even layer, leaving enough room around the edges so that it doesn’t spill over the sides of the cake.
4. Top the custard with another layer of cake. Spread or pipe the remaining custard evenly over it, again leaving some room around the edges.
5. Reserve ½ cup (120 ml) of the stiffly whipped cream. Pile the rest into a mound on top of the custard. Spread it into a thick layer with a thin, flexible spatula or off-set spatula, then hold the spatula at an angle to shape the whipped cream into a dome, piling it up in the middle of the cake as much as possible.  
6. Place the final layer of sponge cake (the one cut from the middle of the cake) on top of the whipped cream. Do not press on the top of the cake – instead, gently tuck the edges of the cake layer into the whipped cream, so that they are flush with the cream. This will create a smooth, seamless dome on top of the cake.
7. Gently spread the reserved ½ cup (120 ml) of whipped cream over the entire cake to fill in any cracks and even out the surface. If necessary, refrigerate the cake to firm it up before continuing.
8. Dust your work surface with icing sugar and press the marzipan into a 6-inch (15 cm) disc (knead it a bit to warm it up first). Coat both sides with icing sugar and roll it out into a 14” (35½ cm) diameter circle less than 1/8” (3 mm) thick. Use plenty of icing sugar to prevent it from sticking. Alternatively, you can roll the marzipan out between two wide sheets of parchment paper (still use plenty of icing sugar).
9. Use the rolling pin to drape the rolled-out marzipan sheet over the cake and smooth it around the cake gently with your hands.

If it seems like it wants to fold or buckle around the cake, gently lift and stretch it away from the cake with one hand while smoothing it down with the other.
Trim the excess marzipan from the bottom of the cake with a paring knife or spatula blade.
Decorate how you wish. You can make a marzipan rose, or leaves, or stick things to it with glucose like I did!
11. To serve, cut the cake into wedges with a large, sharp knife (run the blade under hot water and wipe it clean after every cut for neater slices). The cake can be served immediately but will be easier to slice after chilling in the refrigerator for at least an hour.


Tuesday, May 7, 2013

Peanut Butter Pie

Of course the weather gets nice when finals time comes around and I have to buckle down and study. I can't complain too much though. The workload compared to my classes at home is significantly lighter. Adjusting back may be a little bit rough. But still, I want to be outside! I...have less than two weeks before I go back to the US. Wow. That just hit me. But you can understand that I want to spend that precious little time as wisely as I can. 

As far as I know, these cookies have no bourbon in them.

Spending that time wisely doesn't necessarily mean going on elaborate adventures all the time (though those are nice too). It can mean simply cherishing the moments you have with friends who you likely will not see again for a long time. Sad truths. Aw. Now I've lost my train of thought. Point I was trying to make is to enjoy what you have while you still can. 

Making whipped cream in a jar is not as hard as I expected.

Tying into that nicely is Peanut Butter Pie. I don't think I will ever be able to separate them from this. Almost two years ago Jennifer Perillo lost her husband suddenly and unexpectedly. In a gesture both beautiful and heartbreaking, she asked bloggers to make his favorite dessert, peanut butter pie. So to me, it will always be this food filled with love. And making it was a labor of love; I did everything by hand, from whipping the cream to crushing the cookies for the crust. As usual, sharing it, just taking a moment to sit back and enjoy with my friends, was the best part. 


Peanut Butter Pie

8 oz cream cheese
1 1/2 cups powdered sugar
1 cup smooth peanut butter
1/2 - 3/4 cups milk 
16 ounces heavy cream

(My crust was really thick, but I like it that way. Adjust accordingly)
24 chocolate sandwich cookies
1/4 melted butter

Crush cookies finely. Place in pie tin (or, like me, a 7x10 rectangle. Work with what you have.) Pour butter over the crumbs and stir until crumbs are evenly moistened. I took some crumbs and saved them for sprinkling on the top. Your call. Pat down into a dense layer with the back of a spoon, your hands, a cup, whatever. Set aside. 

Beat together cream cheese and confectioners' sugar. Mix in peanut butter and milk. Beat until smooth. Fold in whipped cream. Spoon onto crust. Top with reserved crumbs if you wish. Freeze until firm.

Tuesday, December 25, 2012

Zuccotto


Merry Christmas, friends! I hope your holidays have been filled with love and family and relaxation and delicious foods. I've basically been on a rotation of sleeping, reading, playing this game, and eating. We did our Italian, scaled down version of Feast of the Seven Fishes last night, and it was quite tasty. Lobster and clams are kind of a rarity in the midwest.


A while back OXO sent me some strange tiny measuring beakers for small amounts of liquids. I've been deliberating about how to use them for a while, and then remembered thatI've been wanting to make this super cute dessert called Zuccotto for a while. Zuccotto means little pumpkin in Italian, which is adorable, and it's traditionally a chilled, hemispherical dealie made with cake, ice cream, and brandy. The version I found used pound cake, chocolate, amaretto, and almond whipped cream, which is a is a little more my speed. The amaretto and almond extract were perfect in my measuring beakers, and made me feel like I was doing science things instead of just baking.


It turned out beautiful, like a little, perfect cake igloo! D'aw. It was a little too boozy for my tastes, but delicious nonetheless. 

But I've gotta go. It's time to eat more food! And then maybe take a nap. 


Zuccotto
From Baked Bree


Ingredients

1 (12-ounce) pound cake (you can make one or buy one, no judging)
1/4 cup amaretto
6 ounces bittersweet chocolate
2 cups whipping cream
1/2 teaspoon almond extract
1/4 cup powdered sugar
1/2 cup sliced almonds (toasted)
cocoa powder for dusting


Coat a large bowl (1 1/2 quarts) with cooking spray. Cover the cooking spray with plastic wrap and let the wrap hang over the edges. Slice the pound cake into thin slices, and cover the bowl with the pound cake. Save some slices for the top. Brush the cake with amaretto.
Melt the chocolate over a double boiler. Let cool.
Meanwhile, whip the heavy cream with the powdered sugar until thickened. Fold half of the cream into the chocolate mixture.
Spread the chocolate mixture on top of the pound cake.
Add the sliced almonds and almond extract to the remaining whipped cream. Fold gently until combined.
Add the almond whipped cream on top of the chocolate mixture.
Cover the top of the zuccotto with the remaining pound cake slices.
Chill for 3 hours, or overnight. Unmold onto a cake plate or platter.
Dust with cocoa powder and slice.

Thursday, March 29, 2012

Tuscaloosa and Tom Selleck

Hey, there's me.


There were still flowers blooming in some of the yards. Windows boarded over, people moved on, but the flowers continued to grow. Last spring, in the Tuscaloosa/Birmingham region of Alabama, a massive tornado struck. The twister seemed to have a mind of its own, striking the poorest areas and the area's aid organizations . Even a year later, there are still spectacular amounts of damage. That's where we came in. 45 college students, eager to help in any way possible. We spent hours in the hot sun, digging up broken glass, cutting down trees, and ripping out foundation. 


I don't do a lot of manual labor, being shut up in my little academic world most of the time. It was really humbling to just get out there and use my hands. It felt good. And it made me so thankful that I had that sleeping bag to crawl into at night, the hot food on my plate, and the support of friends. 


The dessert I made is called a Tom Selleck. I really don't know why, let me know if you do. I wish I could have made one of these in Alabama and shared it with my work group or the kind people who opened their churches to us to sleep in. Sometimes that's the only way I know how to say thank you, with food. 


Tom Selleck

1 1/2 sticks butter
2 Tablespoons sugar
1 1/2 cups flour
8-ounce package cream cheese at room temperature
2/3 cup powdered sugar
whipped cream
chocolate pudding (if you're feeling fancy, make mine! Or use instant stuff)
sprinkles

Start by making the crust.  Mix together butter, sugar, and flour until it is combined. Press the crumbs into the bottom of a sprayed 9×13 pan.  Bake in a preheated 350 degree oven for 15 minutes.  Cool completely. While the crust is cooling, whip 2 cups of heavy cream until stuff peaked form.    Beat the cream cheese and powdered sugar together.  Fold in one third of the whipped cream.  
Spread the cream cheese layer over the cooled crust. Spread the chocolate pudding on top. Cover the top with the remaining whipped cream.  Chill for a few hours or overnight. Add some sprinkles to the top and serve.

Tuesday, January 3, 2012

Cream Puffs

January is a strange time for me. Not because of New Year's Resolutions or anything, I don't do those. September is more of a new beginning for me than January anyway. It's mostly because I'm back at school already. High school friends are still relaxing on break at home and here on campus about 1/3 of the students are off campus doing month long study abroad trips or internships. I'm here, taking an Asian film studies class and enjoying the solitude. 

Those are my feet. Cool, huh?

Even the landscape here is silent, as if acknowledging the decreased activity on campus. Already, New Year's Eve seems a million miles away, the warmth of the kitchen just a memory. I made these cream puffs a mere three days ago, but it seems like so much longer. Funny how traveling to a new location changes one's perception of time so much. 


These cream puffs are exceptionally easy to make. The filling, in my opinion, is much nicer than Vanilla Pastry Cream (which still has its place!). It's a combination of vanilla pudding, homemade whipped cream, and almond extract. Genius. I'm expecting this January term will be a time of reflection and quiet, and lots of baking. Hopefully I can find enough people in this ghost town to taste test...


Cream Puffs
from Good Housekeeping

for Pate a Choux (aka, the puffs)


1/2 cup butter
1 cup water
1/4 teaspoon salt
1 cup flour
4 eggs

Spray 1 or 2 large cookie sheets with nonstick spray. Heat oven to 375.
In 2 qt saucepan over medium heat, heat butter, water and salt till butter mixture boils.
Remove from heat.
Add flour all at once. With a wooden spoon, vigorously stir until mixture forms a ball and leaves sides of pan. One at a time, add eggs to the flour mixture, beating well after each addition. Drop dough in heaping tablespoons (I used my cookie scoop) onto trays and bake puffs for 25ish minutes, or until golden. Let them cool completely before slicing each in half with a serrated knife. 

Almond Cream
1 cup heavy whipping cream
1 1/4 cups milk
1 package instant vanilla pudding (one of the smaller, 4 serving size ones)
1/2 tsp almond extract. 

In a small bowl, beat whipping cream until stiff peaks form. In a larger bowl, prepare vanilla pudding according to package instructions, only using 1 1/4 cups of milk. Gently fold whipped cream and almond extract into the pudding until combined. Chill until ready to use. Spoon about a tablespoon into each puff and cover each with chocolate glaze. Refrigerate if not serving right away. 

Chocolate Glaze 
In a small saucepan over medium/low heat, combine 1/2 cup semisweet chocolate, 1 tablespoon butter, 1 1/2 teaspoons of corn syrup and 1 1/2 teaspoons of milk and stir until melted and smooth.


Tuesday, December 6, 2011

Nutcracker Cake

 (I have a facebook page! Check it out!)

I am tired as usual. Has anyone else found that naps are far better now than they were as a child? Adults totally need naptime more than kids. But soon enough it'll be Christmas break and I'll be slothlike.


This recipe is actually something I made while I was at home, enjoying my rest and relaxation. I wanted to do something ambitious. Something gustatorily complex. Something with TEN EGGS. Yep, that many. I chose the Nutcracker Cake from the Sky High cookbook (which is awesome, check it out) partly because the flavors sounded really nice together and party because I reeeeally wanted to make homemade graham crackers.


Hazelnut, graham, chocolate and rum are combined in a spongy cake (hence the number of eggs) and frosted with sweetened whipped cream. I had a lot of fun putting it together, but I was...a little disappointed with the final outcome. I mean, it was good, but it wasn't my favorite. BUT a). I'm a moist cake person and b). it did get better after a day or two in the fridge. The flavors seemed to develop more. 


Nutcracker Cake

Makes one 9inch triple layer cake
Ingredients – for the cake layers
1 cup skinned hazelnuts (about 4 ounces)
10 whole graham crackers (5½ ounces), broken into pieces (I made my own! I'll give the recipe below)
1¼ cups sugar
2 ounces unsweetened chocolate, finely grated
10 eggs, separated
¼ cup vegetable oil
1 tsp vanilla extract
½ cup all purpose flour
1½ tsp pumpkin pie spice
1 tsp baking powder
Dark chocolate curls for decoration

(Notes: For easy grating, freeze your chocolate beforehand. Way less messy. Skinning hazelnuts is kind of a pain, but it's not that hard. Through your hazelnuts into a pot of water with a couple teaspoons of baking powder and boil them until the water gets really dark. Then, gather them up in a rag or some paper towels and rub them together. The skins should come right off. Watch out - they stain.) 
1. Preheat the oven to 325 degrees F. Butter the bottom and sides of 3 9inch cake tins. Line the base with parchment paper and dust the sides with flour, tap out any excess.
2. Spread the nuts onto a baking tray and toast for 10-12 minutes until lightly browned. Leave to cool completely. Increase the oven temperature to 350 degrees F.
3. In a food processor, grind the graham crackers to crumbs. Transfer to a bowl and set aside. Add the toasted nuts to the processor (no need to wash) and add ¼ cup of sugar. Pulse until the nuts are finely ground, but do not blitz too much or else it will form a paste. Add the nuts, graham cracker crumbs and grated chocolate together in the bowl and mix.
4. In a large bowl, whisk the egg yolks and ½ cup of sugar using an electric mixer until well blended. Add the oil and vanilla slowly, beating until ribbons begin to form on the surface of the mixture. Then, fold in the chocolate nut crumbs.
5. Place the egg whites in a clean bowl and beat until thick and foamy. Gradually add the remaining ½ cup of sugar, continuing to beat until the whites form stiff peaks. Fold a third of the egg whites into the yolk mixture and mix well to slacken the mix. Sift over the flour, spice and baking powder and fold in. Gently fold in the rest of the egg whites until no streaks remain but do not over mix.
6. Divide the batter between the three pans and bake for 25-30 minutes until a toothpick comes out clean. Let the layers cool in the pans for 10 minutes before turning out onto a wire wrack to cool completely.
7. To assemble the cake, place a layer on a cake stand, flat side up. Sprinkle it with a third of the rum syrup and let it all soak in for 1-2 minutes. Spread ¾ cup of crème Chantilly over the top, right to the edge. Repeat with the remaining layers, letting the syrup soak in before adding the crème.
Use the rest of the crème to cover the sides of the cake. Decorate the top with dark chocolate curls.

Rum Syrup
¼ cup sugar
¼ water
¼ cup dark rum
Combine the sugar and water in a small saucepan. Place over a medium heat, stirring until the sugar dissolves. Remove from the heat and add the rum. Allow to cool before using.

Crème Chantilly
2 cups heavy cream
3 tbsp confectioners sugar
1½ tsp vanilla extract
Combine the cream, sugar and vanilla in a chilled bowl and whip until the cream is stiff but not too thick or buttery.

Graham Crackers
(this'll make more than you need, but that's okay!)

1/3 cup honey
2 Tbspn molasses
4 Tbspn whole milk
2 Tbspn vanilla
2 1/2 cups + 2 Tbspn AP flour
1 cup light brown sugar
1 tspn baking soda
3/4 tspn salt
7 Tbspn butter, cold

1. Whisk together the honey, molasses, milk, and vanilla until thoroughly combined. Set aside.
2. Place the flour, light brown sugar, baking soda, and salt in a food processor and pulse until combined.
3. Cut the butter into the food processor and pulse until the mixture resembles a coarse meal.
4. Add the pre-mixed liquid ingredients to the food processor and pulse just until a dough begins to form.
5. Dump the contents of the food processor out onto a lightly-floured surface and form into a rectangle. Cover and chill in the refrigerator until firm, preferably overnight.
6. Preheat the oven to 350 degrees F. Line a baking sheet (or two) with parchment paper or a silpat and set aside.
7. Once chilled, work with the dough in two batches, keeping a batch in the refrigerator while working with the other. Roll the dough out thinly on a lightly-floured surface until it is about 1/8-inch thick. Cut eight 3-inch rounds of dough out and shape the rest as rectangles. Place the cut-out dough on the prepared baking sheets, leaving about one inch between each cracker.  Prick the surface of each cracker a few times with a fork.  Chill the baking sheet for 25-30 minutes.
8. Bake the crackers in the oven for about 18-20 minutes, rotating the sheet half-way through to promote even baking. Remove from the oven when the crackers have turned brown and are slightly firm to the touch. Let cool completely.


Sunday, May 1, 2011

The Blackest Forest Cake

I feel there are no signs of me getting my pictures anytime soon. But I'm not going to let that stop me from posting. I'll link to the site where I originally found this...delightful cake. 

I've been dreaming of this cake since I first laid eyes on it. It looked...mysterious, if you can call a cake that. And, totally out of my baking league. But I thought about it for months. I found myself staring longingly at its picture. Longingly. I longed.
These have nothing to do with the cake but they are beautiful. 
When I recently purchased some black cocoa, this cake dream started to become a reality. I made it. It was labor intensive. Also, the most deep, delicious, fragrant chocolate cake I've had in a long time. I'm not a cherry person, so I switched it out for a raspberry reduction. It was a good choice. 
Here's the moment you've all been waiting for...yah!

Oooh. Aaah. Stephanie is an absolute genius. This make made me realize that I'm capable of making nice, pretty things. This summer, I've been given permission by my sister to make all the desserts for her graduation party. And if all goes well, perhaps others will allow me to cater for their events? I can dream, right? 

Recipe recipe time ^_^ 

The Blackest Forest Cake tweaked from Desserts for Breakfast

Blackest Forest Gateau
makes one 2-layer 9" cake. For suggestions on other sizes, see the tips below the recipes.

for black chocolate cake:
2 cups sugar
2 cups flour
1/3 cup black cocoa powder
2/3 cup Dutch-processed cocoa powder
1 tspn salt
1 tspn baking powder
1 tspn baking soda
2 eggs, beaten
1/2 cup vegetable oil
1 cup whole milk
1 cup boiling water

1. Preheat oven to 350 degrees F.  Grease, flour, and line the bottoms of two 9" round cake pans.  If desired, line the cake pans with bake-even strips.
2. In a mixer bowl, combine sugar, flour, black and Dutch-processed cocoa, salt, baking powder, and baking soda.  Mix to combine.
3. In a separate bowl, combine the beaten eggs, vegetable oil, and milk.  Stir to mix.  Then, with the mixer on low, pour the wet ingredients into the dry ingredients.  Mix on low until evenly distributed.
4. Pour the boiling water into the batter and mix on medium low until smooth.
5. Divide the batter between the two cake pans.
6. Bake for 35-45 minutes.  When a toothpick inserted into the center of the cake comes out cleanly, the cakes are done.  Remove from the oven and let cool completely.

for dark chocolate ganache:
3 oz. dark chocolate, chopped
2.5 oz. manufacturing or heavy whipping cream
1 Tbspn butter
1 Tbpsn Godiva chocolate liquor, optional

1. Place the chopped chocolate in a bowl and set aside.
2. In a saucepan, heat the cream and butter just until simmering.
3. Pour the hot cream mixture over the chocolate.  Let sit for a minute or so.
4. Whisk the cream into the chocolate until smooth.  Add the liquor, if using, and mix until thoroughly combined.
5. Spread a thin layer of ganache on top of both of the cooled chocolate cakes.  Let set for at least two hours, or an hour in the refrigerator.

for raspberry filling:
1 cup frozen raspberries
4 Tbspn sugar
juice of 1/2 lemon
1/2 tspn cornstarch, sifted

1. In a nonreactive saucepan, saute the raspberries on medium high until they begin to release their juices.
2. Add the lemon juice, sugar, and sifted cornstarch to the raspberries, making sure to whisk to combine the cornstarch.
3. Stirring constantly, bring the contents to a boil and simmer until the raspberries have reduced and are thickened, about 5-7 minutes.
4. Remove from heat and let cool completely. Set aside.


for mascarpone whipped cream:
1 cup mascarpone cheese
4 cups manufacturing cream, or heavy whipping cream
2/3 cup powdered sugar

1. Combine the mascarpone cheese and cream in a bowl.  Whip until soft peaks.
2. Add the powdered sugar to the cream, continue whipping just until you reach stiff peaks.  Be careful not to overwhip!  Use immediately.

assembly:
1. Spread a layer of mascarpone whipped cream on the prepared ganache-chocolate cake.
2. Top the whipped cream with the raspberries.
3. Place the next layer of cake on top of the raspberries and whipped cream.
4. Frost the outside of the cake with the remaining cream.  Decorate with chocolate shavings, chocolate trees, fresh raspberries, or a dusting of powdered sugar/cocoa powder, if desired.
5. Store in the refrigerator.

To make what I made (2 two layer 4 inch cakes), half the cake and whipped cream recipes, and bake in two 4 inch round pans. Slice the cakes in half, and fill as directed.

Saturday, November 20, 2010

It's Mah Birthday.

Well, almost anyway. Some people think it's sad to make your own birthday cake. Au contraire! It's fun, and you get to see your work being enjoyed. Birthdays are kind of a big thing in my family. I dunno why, it's just nice to celebrate. Usually my mom will cook whatever food I request, and we either make my cake together or she'll do it for me. I usually pick something rather complex and chocolate-y. Last year we made a Chocolate Darjeeling Tea Cake. This is the first year I'm alone (well, not with my family) for my birthday, and I totally do not have the resources to make a fancy layer cake. So I went for the old standby, a zebra cake! 

Ooh, ahhh. How did you do that Rebecca? It looks hard! Never fear readers, it's incredibly easy. I was exposed to this recipe at a very young age by way of the Magic Spoon Cookbook. So if a ten year old can make it, so can you! It's just whipped cream and chocolate wafer cookies. 
Heck, you can use Cool Whip and stale Oreos for all I care. 

It's delicious. Stick it in the fridge for a while and the cookies turn into cake. Cut it diagonally if you want the pretty zebra stripes. 

Zebra Cake

1 pint heavy cream
1 package chocolate wafer cookies
2 Tbsp powdered sugar
1/2 Tsp vanilla

1. Pour heavy cream into a largish bowl. Add sugar and vanilla, and beat until soft peaks form. 
2. Put a couple teaspoons of whipped cream between two cookies. Repeat process. So you get this kinda thing going on. Make two cookie stacks about twelve cookies each, and lay them next to each other on a 13x9 inch pan. 
3. Put some whipped cream between the stacks to glue them together, and cover the whole thing in whipped cream. Stick it in the fridge for at least four hours, and presto, you've got yourself a cake. 
I love whipped cream.

Because I have a lot of friends, I made two cakes. This second one was just me messing around. It's not that beautiful, but it tastes fantastic. I took an Oreo crust, made some more whipped cream, quick baked some double chocolate cookies from a mix I had (I know, I know...) and layered it with whipped cream in the crust. Mmm. Everyone really, really  liked this. You should try it. Experiment with different cookies and crusts and such. I dare you. 
It's the taste that counts...
Delicious Cookie Pie Thing

1 Oreo Crust (or graham cracker, or whatever) 
Approximately 10 cookies (any type you like)
1 pint heavy cream
1/2 tsp vanilla
2 Tbsp powdered sugar

1. Sugar, vanilla, cream, go! Whip until you get yourself some soft peaks. 
2.Spread a layer of whipped cream on the bottom of the crust. Then add a layer of cookies on top of it. Then a layer of whipped cream. Then cookies. You get it. End with a layer of whipped cream on the top. 
3.Stick it in the fridge for at least four hours, remove, devour.