Showing posts with label butter. Show all posts

Tuesday, February 4, 2014

Kouign Amann

Blogging with a dog on my lap is difficult, but I will try my best. I'm at home for a bit before my next (and final) semester begins. Gah. Last semester. I won't lie to you. I'm scared. It's the biggest unknown yet. What does it mean to be part of the real, adult world? What does success even look like? Different things for different people. I need to spend some time thinking long and hard about what brings me joy, and not what I'm expected to do. I'll let you know if I figure that one out. 

SO MUCH BUTTER.

Right now...yeah, I know I need to figure my life out, but I'm also trying to take advantage of the fact that I am currently surrounded by friends. Everyone will scatter soon, opportunities drawing them to all corners of the country. Is real life lonely? I don't want to spend my days working, then going back to an empty house, eating alone, then reading or watching tv until it's an acceptable hour to go to bed. Ahhhhhhhhhhhhh. Ah. No. Okay. 


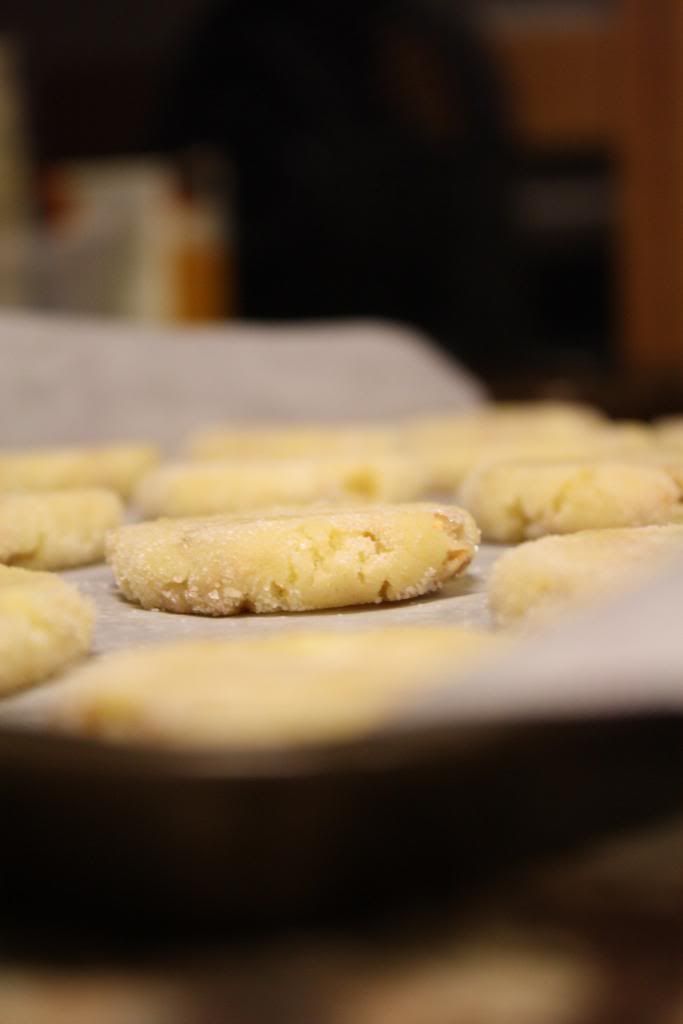
We're going to talk about nice things now. Kouign Amann is nice (pronounce it like queen ahmon. I love saying it). It literally means butter cake in Breton, which is basically what it is. Flaky, croissant like dough, with tons of crunchy sugar on top. It is pretty ugly (rustic!), but it's easier than something like croissants or danish. A good gateway to the pastry world. Make a ton of dough and freeze some for later, to pull out when friends are visiting. Or eat it all if you don't have friends, like me in the future (just kidding! I hope.) 


Kouign Amann 
from Joe Pastry
(This makes about four, nine inch pastries)

1 lb. 12 ounces all-purpose flour
1 ounce melted butter
14 ounces water
1 tablespoon, two teaspoons instant yeast
1 lb. lightly salted butter
egg wash (2 beaten eggs plus two teaspoons water)
1 cup granulated sugar for topping (this is the amount of sugar you need to top FOUR of them. Keep it in mind). 


Combine the flour, melted butter, water and yeast in the bowl of a mixer fitted with a paddle. Stir until all ingredients are moistened and switch to the dough hook. Knead for 1-2 minutes, until a dough forms. Transfer the dough to a large bowl, apply cooking spray or a small amount of oil, cover with plastic wrap, and allow it to sit for 1/2 an hour, until about doubled. 

About ten minutes before the dough is ready, make your butter block. (If you're unfamiliar with laminating dough, go here). Make your dough packet, roll it out and give it two turns, resting the dough for 20 minutes in the refrigerator after each turn, covered with plastic wrap. The dough will rest happily in your refrigerator for 2-3 days days at this point, or it can be frozen for three months. 

When ready to make your pastries do a final turn, this time sprinkling sugar over the dough before you fold it. Cut the dough into four pieces (just under 16 ounces each) and roll them out to 8″ to 9″ circles. (alternately, you can roll the dough out flat, cut it into small square and shape the squares as you would cheese Danishes). Place the circles into parchment-lined pans, cover with plastic wrap and let them rise for 1 to 1 1/2 hours, until puffy. 

While the kouigns are proofing, preheat your oven to 400. When they’re fully proofed, paint them with egg wash, sprinkle them liberally with sugar and bake for 20-25 minutes until browned. Serve warm.

Wednesday, December 12, 2012

The Great Food Blogger Cookie Swap!

I love when I can use my passions to help other people. So when I caught wind of the Great Food Blogger Cookie Swap, I jumped at the opportunity to bake for a good cause. Food bloggers from all around the word gathered together to partner with Cookies For Kids' Cancer, an organization dedicated to finding new ways to fight pediatric cancer. Here's their mission statement:

Cookies for Kids' Cancer is committed to raising funds to support research for new and improved therapies for pediatric cancer, the leading cause of death by disease for children under the age of 18. Through the concept of local bake sales, Cookies for Kids' Cancer provides the inspiration and support for individuals, communities, and businesses to help fight pediatric cancer. 


Additionally, my beloved OXO promised to match every donation made by the bloggers of the cookie swap, up for $100,000 dollars. I think that's pretty awesome. They gave us some pretty sweet spatulas as well. I am amazed by people's generosity. Whenever I'm feeling generally angsty about humanity, I can just think of things like this cookie swap and feel better. 


For my cookie contribution, I wanted to make something that was sturdy enough to last in the mail but still delicious and not rock-like. These butter toffee cookies are perfect. They've got some substance to them and stack nicely, but still have a delicious chewy center. I hope they were still good upon arrival! 

Overall, the cookie swap was a wonderful experience and I'm so glad I got to take part. If you're interested in hosting your own bake sale or donating, head on over to Cookies for Kids' Cancer's website to get more information. I'm sure it will be appreciated.  '


Butter Toffee Cookies
from Land O' Lakes
makes 3 dozen

1 cup sugar
3/4 cup butter, softened
1 egg
1 teaspoon vanilla
2 cups all-purpose flour
1 1/2 teaspoons baking powder
1/4 teaspoon baking soda
1/2 cup English or almond toffee bits
Sugar for rolling

Heat oven to 350°F. Combine sugar, butter, egg and vanilla in large bowl. Beat at medium speed, scraping bowl often, until creamy. Add flour, baking powder and baking soda; reduce speed to low. Beat until well mixed. Stir in toffee bits by hand.

Shape dough into 1-inch balls. Roll in sugar. Place 2 inches apart onto ungreased cookie sheet. Flatten each with bottom of glass to 1 1/2-inch circles. (If glass sticks, dip glass in sugar.)


Bake for 9 to 11 minutes or until edges are just lightly browned. (Do Not Over Bake.) Sprinkle with sugar while warm. Cool completely.


Saturday, November 17, 2012

Scenes From My Life

Whenever I read blogs, I kind of wonder what bloggers do in the outside world. Y'know, when they're not taking pictures of their perfectly positioned food or telling amazing, relevant stories. I'm not bitter, I just am incredibly aware of how far away I am from that position. I am nowhere near perfect. And as much as I wish I could make something like this my life...I'm not at that point. I have homework, haha. Do you want to see some of the things I do outside of the blog? 


I've grown increasingly fond of rock climbing over this semester. It's so fulfilling for me to set challenges just for myself and feel my strength growing until I can reach my goals. 

This is Jackie. She is a ham.

I volunteer at the humane shelter once a week, feeding cats and cleaning out their cages, and walking and playing with dogs. It makes me sad that there are so many strays/abandoned pets, but I've seen so many get new homes. I really commend those who adopt.


Last weekend I went to a Diwali festival. Previously, I knew next to nothing about the holiday, and I'm so glad I got the opportunity to learn more about it. Also, I tried to make halwa and planned on doing a Diwali blog post, but it failed miserably. Such is life.


Last night was International Food Night, an opportunity to students to visit different honor houses and try foods from all over the world. The house I cooked in had food from Japan and Paraguay. The above is Okonomiyaki, a savory Japanese pancake. I met a lot of new, great people and learned how to cook something I've never made before! 


Here is my latest baking experiment - Cocoa biscuits with brown sugar cinnamon butter. They're not very sweet, and more like a cakey brownie than a biscuit, but I like them. Something simple to fill the baking urge. I'll share the recipe.

So there's my life. Thanks for letting me share with you. 

Cocoa Biscuits with Brown Sugar Cinnamon Butter

2 1/2 cups all purpose flour
1/2 cup unsweetened cocoa powder
1/2 cup brown sugar + 2 tablespoons
4 teaspoons baking powder
1/2 teaspoon salt
1 teaspoon baking soda
1 1/2 sticks (3/4 cup) cold butter, cut into pieces
1 1/4 cup buttermilk
2 teaspoons vanilla extract

Preheat oven to 425 degrees F.
In a large bowl, combine flour, cocoa, sugar, salt, baking powder and soda, and whisk until combined. Using a fork, pastry blender or your hands, add butter pieces to the flour and mix until coarse little crumbles remain. Add buttermilk and vanilla, stirring with a spoon until just combined, not overmixing. Use your hands if needed to bring the dough together.
Use  1/4 cup measure to drop batter onto a nonstick baking sheet, or press dough on a sheet of parchment paper or cutting board, then using a biscuit cutter to shape the dough into rounds. Bake for 12-15 minutes, or until biscuits are set and slightly golden on the edges. Serve immediately.

Brown Sugar Cinnamon Butter
1/2 cup unsalted butter, softened
3 tablespoons brown sugar
1/2 teaspoon cinnamon
pinch of salt
Add all ingredients in a bowl and mash until combined!


Saturday, October 27, 2012

Napoleon!

OoooOoooo! Almost Halloweeeeeen! I'll be...at school. Maybe working at the writing help desk. Maybe having some spookytimes. Maybe I'll steal a child so I can systematically organize their candy into neat piles. That was always the best part. Halloween was great as a kid. I have so many fond memories. Refusing to participate in the Halloween parade in kindergarten (I was a lobster, by the way. How many kids are lobsters these days?), standing awkwardly on people's porches after they'd given me candy because I couldn't see out the eyeholes of my robot costume, and....having all the adults and teenagers who answered the door laugh hysterically when I came around dressed like this. I had a silly upbringing, haha. 


But that is all past, and Halloween in college is different and not really my thing. I think I'd appreciate it more if it was less like this and more like this.  Anyway...time for super challenge food! Check it: 
Our October 2012 Daring Bakers’ challenge was hosted by Suz of Serenely Full. Suz challenged us to not only tackle buttery and flaky puff pastry, but then take it step further and create a sinfully (gah, that woooooord) delicious Mille Feuille dessert with it!

Mille-feuille is also known as custard slice or, more familiar to me, Napoleon. It really has no connection to the tiny conqueror though. 


Puff pastry had been on my list of things to make for a while, so I'm glad I finally had an excuse to take on this labor intensive project. I underestimated how difficult this would be. Rolling and folding and cutting and rolling...okay, also, protip: don't put wax paper in the oven. Just don't do it. The final product was amazing. But so, sooooo hard to cut into neat pieces. I just kind of gave up after a while. Maybe it needed a longer chill time? Bottom line? I have such great respect for bakers who make these everyday for their jobs. I can't imagine how you do it. I aspire to be as skilled as you. 


Napoleon!
(read all steps before proceeding. You wanna give yourself enough time for this)
Puff Pastry: 

Ingredients
1¾ cup (250g) plain/all-purpose flour
Scant ¼ cup (55 ml) (1¾ oz)(50g) unsalted butter, chilled and cubed
1 teaspoon (5ml) (6 gm) salt
½ cup plus 2 tablespoons (5/8 cup)(150 ml) cold water

14 tablespoons (210 ml) (7 oz) (200g) butter (for the beurrage), room temperature
3½ tablespoons (55ml) (30g) plain flour (for the beurrage)

Additional flour for rolling/turning
Directions:
1. Cut the larger quantity of butter into smallish pieces and set aside at room temperature.
2. Put the larger quantity of flour into a bowl with the salt and the cold, cubed butter.
3. Lightly rub the butter and flour between your fingertips until it forms a mealy breadcrumb texture. 

 4. Add the cold water and bring together with a fork or spoon until the mixture starts to cohere and come away from the sides of the bowl.
5. As the dough begins to come together, you can use your hands to start kneading and incorporating all the remaining loose bits. If the dough’s a little dry, you can add a touch more water.
6. Knead for three minutes on a floured surface until the dough is smooth.
7. Wrap in clingfilm and refrigerate for at least 30 minutes.

8. While the dough is chilling, take your room temperature butter and mix with the smaller amount of plain flour until it forms a paste.
9. Place the butter paste between two sheets of clingfilm, and either with a rolling pin or your hands (I found hands easiest) shape it into a 4.5”/12cm square. You can use a ruler (or similar) to neaten the edges.

10. Refrigerate for about 10-15 minutes so the butter firms up slightly. If it’s still soft, leave it a bit longer. If it’s too hard and inflexible, leave it out to soften a touch. You want it to be solid but still malleable.
11. Once the dough has chilled, roll it out on a floured surface into a 6”/15cm square. Place the square of butter in the middle, with each corner touching the center of the square’s sides).
12. Fold each corner of dough over the butter so they meet the center (you might have to stretch them a little) and it resembles an envelope, and seal up the edges with your fingers. You’ll be left with a little square parcel.

13. Turn the dough parcel over and tap the length of it with your rolling pan to flatten it slightly.
14. Keeping the work surface well floured, roll the dough carefully into a rectangle ¼ inch /6 mm in thickness.
15. With the longest side facing you, fold one third (on the right) inwards, so it’s covering the middle section, and ensure that it is lined up

16. Then, fold the remaining flap of dough (on the left) inwards, so you’re left with a narrow three-layered strip.
17. Repeat steps 14, 15, 16.
18. Wrap up in clingfilm and chill for at least 30 minutes.
19. Repeat steps 14, 15, 16 twice.
20. Wrap up in clingfilm and chill again for at least 30 minutes.
21. Repeat steps 14, 15, 16 two final times.
22. Wrap up in clingfilm and refrigerate until needed. The dough keeps a couple of days in the fridge.


Crème Pâtissière:

Ingredients
2 cups (450ml) whole milk
¼ cup (1¼ oz)(35 gm) cornflour/cornstarch
1 cup less 1 tablespoon (200gm) (7 oz) caster sugar
4 large egg yolks (if you’re making the royal icing, reserve two egg whites)
2 large eggs
¼ cup (2 oz) (60gm) unsalted butter, cubed
2 teaspoons (10 ml) vanilla essence

Directions:
1. Mix the cornflour/cornstarch with ½ cup of milk and stir until dissolved.
2. Heat the remaining milk in a saucepan with the sugar, dissolving the sugar and bringing the milk to the boil. Remove from heat.
3. Beat the whole eggs into the cornflour/milk mixture. Then beat in the egg yolks. Pour in 1/3 of the hot milk, stirring constantly to prevent the eggs from cooking.


4. Now, bring the remaining milk back to the boil, and add the eggy mixture, whisking as your pour. Keep whisking (don’t stop or it’ll solidify) on a medium heat until the mixture starts to thicken. 
5. Remove the saucepan from the heat and thoroughly whisk the pastry cream. At this stage the pastry cream can look slightly lumpy, but a good whisking soon makes it smoother.
(If you’re worried about the pastry cream continuing to cook off the heat, you can transfer it to a stainless steel/ceramic bowl.)
6. Beat in the butter and vanilla until fully incorporated.
7. If you haven’t already, pour the pastry cream into a stainless steel or ceramic bowl, and then place clingfilm over the surface to stop a skin forming.
8. Refrigerate overnight to give the pastry cream time to further thicken.


Puttin' it Together!

Ingredients
1 x batch pâte feuilletée/puff pastry (see above)
1 x batch crème pâtissière/pastry cream (see above)

2 ¾ cups (660 ml) (12⅓oz) (350gm) icing sugar
2 teaspoons (10 ml) lemon juice
2 large egg whites
½ cup (2¾ oz) (80gm) dark chocolate

Directions:
1. Preheat oven to moderately hot 200 °C /400°F/gas mark 6.
2. Lightly dust your work space with flour and remove your dough from the fridge.
3. Roll into a large rectangle, the thickness of cardboard. The recipe I followed specified no other dimensions, but I rolled mine to about 12”/30cm x 18”/46cm.

(I found it easiest to start the rolling on the work surface, and finish it off on a large piece of greaseproof paper. That way it’s easier to move the sheets of pastry around.)
4. Cut into three equal pieces and place on a baking tray. If you don’t have space for all three, you can bake them separately.
5. Prick the pastry sheets all over with a fork.
6. Place another sheet of greaseproof paper over the top and then a heavy baking tray. This will prevent the layers from puffing up too much.

( I found my baking trays weren’t heavy enough, so also used a pyrex dish to add more weight. Just ensure that the pastry sheets are evenly weighted down.)

 7. Bake each sheet for about 25 minutes in a moderately hot oven 200 °C /400°F/gas mark 6, removing the top layer of greaseproof paper/tray 10 minutes before the end for the tops to brown. Keep an eye on them and lower the temperature if you think they’re browning too much.
8. Remove the baked sheets from the oven and leave on a wire rack to cool.

9. Once the pastry has cooled, you’re ready to assemble your mille-feuille. Get a sturdy flat board, your pastry and the chilled crème pâtissière from the fridge.
10. Lay one sheet on the board and spread half the crème patisserie evenly over the top.
11. Take the second sheet and place it on top, pressing down lightly with your hands to ensure that it sticks to the filling.
12. Spread the remaining crème pâtissière and place the last sheet of pastry on top, pressing down again. (Don’t worry if there’s some oozing at the sides. That can be neatened later.)
13. Pop in the fridge while you prepare the icing / chocolate.
14. Melt the chocolate in a water bath, stirring periodically. Once melted, transfer to a piping bag (or plastic bag with end snipped), resting nozzle side down in a glass or other tall container.
15. To make the icing, whisk 2 egg whites with 2 teaspoons lemon juice until lightly frothy.
16. Whisk in about (2 cups) 300gm of the icing sugar on a low setting until smooth and combined. The mixture should be thick enough to leave trails on the surface. If it’s too thin, whisk in a bit more icing sugar.
17. Once ready, immediately pour over the top of the mille-feuille and spread evenly. I found that I didn’t quite need all of the icing.
18. Still working quickly, pipe a row of thin chocolate lines along the widest length of your pastry sheet (see below). You can make them as far apart/close together as you like.
19. STILL working quickly (phew), take a sharp knife and lightly draw it down (from top to bottom) through the rows of chocolate. A centimeter (½ inch) or so further across, draw the knife up the way this time, from bottom to top. Move along, draw it down again. Then up. And so on, moving along the rows of chocolate until the top is covered in a pretty swirly pattern. 
20. Once you’ve decorated your mille-feuille, with a clean knife mark out where you’re going to cut your slices, depending on how big you want them to be and leaving space to trim the edges. I got ten out of mine – two rows of five.
21. Chill for a couple of hours to give the icing (etc.) time to set.
22. With a sharp knife, trim the edges and cut your slices.
23. Dig in!  


Sunday, May 6, 2012

Pocky + Butter Mochi

"These are all free, right?" said a visibly tipsy guy in a bro-tank and backwards hat, gesturing at our table.
"Nope, they're all for the Taiko Club bake sale!" I chirped pleasantly, silently chastising him. Of course it's not free. Nothing's ever free. And isn't 11:00 am a little early to be drunk? But by that time he'd walked away in the middle of my sentence. 


Guys, I'm worn out. I've got enough on my plate right now without having to deal with inconsiderate people. I'm trying to talk about this without sounding all self righteous, but I just don't like having to deal with public displays of buffoonery. Mer. 


Mkay, enough negativity. What's cool in my life right now? I went to an amazing Kina Grannis concert. I figured out how to cold brew tea. And I made some awesome foods for a successful bake sale! We've talked about mochi on here a few times before. I believe this is my most delicious result. You can't go wrong with eggs, sugar, butter, and coconut milk. Gooey happiness. And pocky? A much loved Japanese snack food that consists of a biscuit stick dipped in chocolate. Can't go wrong with that.


Pocky
adapted from Not Quite Nigella 

Make 65

  • 1 Tbsp icing sugar sifted
  • 2 cups flour
  • 2 1/4 tsp active dry yeast
  • 4.5 Tbsp milk, lukewarm
  • 2 Tbsp honey
  • 2 Tbsp butter at room temperature
1. Combine the yeast, honey, and lukewarm milk in a small bowl and stir to combine. Mix the dry ingredients on a low speed.
2. Add the yeast mix to the dry ingredients. Mix together on medium speed to form a dough. Add butter and 4ish Tbsp water and continue mixing until the dough is firm and elastic. 
3. Wrap the dough in plastic wrap and refrigerate for at least 1 hour.
4. Preheat the oven to 180c/350F. Divide hte dough into two and knead the dough until smooth then roll it out into a rectangle. Roll it out to 4mm thick (1/4 inch). With a ruler and a sharp knife,  cut 5mmx15cms strips and carefully transfer these onto a lightly greased baking tray or greaseproof paper lined baking tray.
5. Bake in the oven for 10-15 minutes (watch it, it may take a bit longer or shorter). You want it golden brown, not light yellow as it will not “snap” properly.

Decorate however you want! I did chocolate, sprinkles, coconut and almonds! 

Butter Mochi

  • 1 (16 ounce) box mochiko sweet rice flour
  • cups sugar
  • 2 teaspoons baking powder
  • 2 (14 ounce) cans coconut milk
  • 3 eggs
  • 1/2 cup butter, melted
     
    Preheat oven to 350 degrees. Grease a 13x9x2" pan. In a large bowl, sift together mochiko flour, sugar, baking powder, and mix well. In a medium bowl, combine coconut milk and eggs, and mix well. Make a well in the dry ingredient and incorporate the liquid ingredients.Stir in melted butter. Pour into pan, and tap pan to settle batter. Bake for 45-60 minutes until golden brown. Cool at least 2 hours before cutting.


Friday, April 27, 2012

Simple Brown Sugar Cake


Ahem. I'm feelin' sassy today so I'll share one of my food pet peeves with you. I know I'm weird and frequently self righteous, but just hear me out on this one. Stop adding "guilt-free" or "you won't even know it's healthy!" or "surprise ingredient!" as modifiers to recipes. Just stop.

True that, mug, true that.

You shouldn't feel guilty about eating. That's just not a good mentality to have. And I don't appreciate recipes trying to trick me into "eating healthy" or assuming that I won't be able to tell the difference between a normal brownie and one with prunes in it. That's insulting. We are capable of making our own decisions about our own bodies...we're not two year olds who need to be slipped veggies. Did you know that if you type the word "guilt" into the search bar of foodgawker, you'll get 368 hits? Think about that. 


Desserts made with butter and sugar and eggs are not "sinful" or "indulgent". Dessert is dessert is dessert. Take it for what it is and enjoy it in moderation. There is nothing secret about this cake. I will tell you up front that there is butter and shortening in it. I never use shortening. But hey, you gotta live a little. And let me tell you, this cake is absolutely fantastic. In my opinion, best thing I've made in a while. And I didn't feel guilty eating it at all. 


Brown Sugar Cake
adapted slightly from Chocolate and Carrots
 Just so you know, this makes a lot of cake. So don't freak out.
  • 1/2 pound butter
  • 1/2 cup crisco
  • 2 cups brown sugar
  • 5 eggs
  • 3 cups flour
  • 1 teaspoon baking powder
  • 1 cup milk
  • 1 tablespoon vanilla extract
Preheat oven to 350°.
Cream the butter and crisco together.
Add the sugar and beat until creamy.
Add the eggs and beat.
Sift the dry ingredients into the creamed mixture and add milk and vanilla.
Bake in 2 rectangular or square pans for an hour. I used an 8x8 and a 9x13.

  • 1/2 cup butter
  • 1 cup packed brown sugar
  • 1/4 cup milk
  • 2 1/2 powdered sugar, sifted
Melt the butter over the stove and add the brown sugar.
Boil on low heat for 2 minutes.
Add the milk and stir until boiling.
Remove from heat and cover slightly.
Add the powdered sugar and stir.
Pour and spread quickly over the cakes.

Thursday, February 16, 2012

Chocolate Chip Banana Bread Scones

Oof. I just found a large cocoa patch on my jeans. I'm not sure how it got there, but it's rather unsightly and I hope it hasn't been there for long. I'm glad no one walked in to the bathroom, only to find my scrubbing my inner thigh while wearing these bad boys (don't ask).


This recipe was chosen via poll on the facebooks. If you aren't already a fan of me there, you should totally get on that. Don't you want more me in your life? Ahem, okay, I feel like I've talked about how freezing bananas and then thawing them out makes them slither out of their skins but I'm not sure I emphasized how creepy it is. I was holding them at arms length the whole time. I don't think I will ever get over this. It's like living in fear of those tubes of biscuit.


Mkay, scones. I've made british-y type scones before, with clotted cream and lemon curd, but never this type of thing. The important thing with scones is cold butter. This makes little pockets in the dough that creates layers, since the butter isn't like, fully incorporated. It separates the dough! Make sure to work quickly, so the heat of your hands doesn't melt the butter. Got it? Now off you go!

Scones taped to the wall outside my friend's door. Haha.


Chocolate Chip Banana Bread Scones
adapted from the family kitchen


2 very ripe bananas (about 8 oz or 1 cup once mashed)
2-4 tablespoons milk
1/2 cup greek yogurt
2 1/2 cups all-purpose flour
4 tablespoons granulated sugar
2 teaspoons baking powder
1/2 teaspoons salt
1 teaspoon cinnamon
4 tablespoons unsalted butter, very cold
¾ cup semisweet chocolate chips
For the glaze:
1 tablespoons butter
2 tablespoons milk
1/4 cup packed brown sugar
1/4 teaspoon vanilla extract
1/2 cup confectioner’s sugar

1.In a large bowl mash the bananas, add the milk and yogurt and stir together. Set aside.
2. Whisk together the flour, sugar, baking power, salt and cinnamon in a large bowl. Cut the butter into several pieces and work it into the dry ingredients with a fork or your fingers until the butter is completely worked in the looks like small peas.

3. Pour the flour mixture into the banana mixture and stir well until just incorporated. Fold in the chocolate chips with a wooden spoon.

4. Place the dough on a piece of plastic wrap and pat it into a disk about 1-inch thick and wrap it tightly. Freeze the disk for about 30 minutes.

5. Preheat the oven to 400F.

6. Remove the plastic wrap and place the disk on a lined baking sheet and cut into 8 even wedges. Pull them apart a little bit to allow for expansion. Bake for 25-30 minutes or until just golden.

7. To make the glaze, melt the butter and milk together in the microwave. Whisk in the brown sugar, vanilla and confectioners sugar until completely smooth. Once the scones have cooled drizzle the glazed directly over them and serve.

Wednesday, December 14, 2011

Scottish Shortbread + Giveaway

Butterbutterbutterbutter.  It is wonderful. And a key component in shortbread. And apparently a healthy snack, haha.
Look guys! Only 100 calories per serving!
Anyway, shortbread is fantastic, if you make it right. Don't try and skimp on the butter, you'll end up with a crumbly mess that sticks in your throat and chokes you. I don't understand those recipe that don't cream the butter and sugar together. It'll never get solid if you're using a fork or something! So yeah, make this recipe. It won't fail you, I swear.

Silky smooooth

Okay guys, so, I love you. I mean it. And I wish I could give you something fancy like a kitchenaid mixer or some special ingredient, but I can't really afford that. So...I would absolutely love to make you a batch of cookies as a sign of my appreciation. It's the least I can do. Here's the deal: while yes, in an ideal world I would send ALL of you cookies, I would get sucked into a cookie black hole never to be seen again. So I'm giving away cookies to TWO winners. Open to the US only, sorry international readers :c All you need to do is leave me a comment saying what your favorite kind of cookie is (or you can comment something else, whatever, haha). I'll keep the giveaway open through Monday, then announce the winners (who will be chosen randomly) here. Make sure you give me a way to contact you! Please leave comments. If I don't get any comments, I'll feel sad and neglected.


Scottish Shortbread

Ingredients
1 pound softened butter
1 cup packed brown sugar
4 cups flour


Preheat oven to 325 degrees F (165 degrees C).
Cream butter and brown sugar. Add 3 to 3 3/4 cups flour. Mix well.
Sprinkle board with the remaining flour. Knead for 5 minutes, adding enough flour to make a soft dough. Roll to 1/2 inch thickness. Cut into 3x1 inch strips. Prick with fork and place on ungreased baking sheets.
Bake for 20 to 25 minutes until edges are browned.


Saturday, June 4, 2011

Brioche


I'm developing this baking patience that I never used to have. Maybe it's something that comes with age? It shows up everywhere, but is especially necessary in bread making. There's just so much peace in getting just the right temperature for yeast to thrive, kneading rolling...waiting. 

Whoa, magic yeast!
That waiting for the dough to rise period is a good time to think. Or slide around on the hardwood floor in your socks, either works. 


I had some egg yolks hanging around in my fridge that needed to get used up, so my bread cravings + lonely yolks = Brioche. Brioche is a wonderfully tender french bread (probably due to the fact that it's loaded with eggs and butter. Yay.) The dough was a dream to work with, really soft and smooth. Also, it makes killer french toast


Seriously. Don't even try to resist. 


Brioche
adapted from Almost Bourdain

Ingredients

2/3 cup milk
1½ tsp dried yeast
5 egg yolks, at room temperature, lightly beaten
3 cups flour, plus extra for dusting
2 T sugar, plus extra for dusting
10.5 T butter, diced and softened
For brushing: eggwash
  

(sorry for the annoying tabbing, can't figure out how to make it go away.)
1. Warm milk until it reaches around 100-110 degrees F. Combine yeast, 1 tsp of sugar  and half the milk in a bowl, stirring to dissolve. Stand in a warm place until foamy (8-10 minutes).
2. Whisk remaining milk with egg yolks in a bowl and set aside.
3. Mix flour, remaining sugar and a pinch of salt in the bowl of an electric mixer, fitted with a dough hook, until combined. Make a well in the center, add yeast mixture and yolk mixture. Beat on medium speed until a smooth dough forms (4-5 minutes).
4. While mixing, gradually add one-third of butter at a time, beat until dough is elastic and pulls away from sides of bowl (8-10 minutes). 
5.Transfer to a lightly buttered bowl, cover and stand until doubled in size (1½-2 hours). 
6. Punch dough, knead on a lightly floured surface until smooth, shape into a loaf and place in an 9"x 5" greased loaf pan. Cover, stand until doubled in size (30 minutes-1 hour). Meanwhile, preheat oven to 350.
7. Brush top with eggwash, dust with sugar, bake until golden and risen (25-30 minutes).